Why Does My Digital Piano Key Stick and How Can I Repair It?
Have you ever pressed a key on your digital piano, only to have it stick or feel slow to respond? It’s a frustrating problem for any player.
A sticky key can turn a beautiful melody into a choppy mess. This issue often catches musicians off guard, especially during practice or a live performance.
The good news is that this problem is common and usually fixable. Dust, old grease, or humidity changes are often the hidden culprits behind the stuck key.
Sometimes, the issue runs deeper, like a misaligned part inside the key mechanism. Other times, it’s simply debris that has settled where you can’t see it.
This guide will walk you through why your digital piano key sticks in the first place. We will explore the common causes, from environmental factors to internal wear and tear.
By the end, you will feel confident diagnosing and fixing this annoying issue yourself.
In a Nutshell
- Dust and debris are the most common culprits. They build up around the key mechanism and cause sticking.
- Old grease can turn thick and gummy over time. This makes keys feel slow or stuck in place.
- Humidity and temperature changes affect wood and plastic parts. This can cause keys to swell or misalign.
- Start simple. Clean around the keys with a soft brush or compressed air before disassembling anything.
- If cleaning does not help, you may need to open the keyboard assembly. Check for broken parts or misaligned key slips.
- Always test every key after reassembly. This helps you catch missed problems early.
- When in doubt, contact the manufacturer. This is especially true if you spot damaged internal parts.
Common Causes of Sticky Digital Piano Keys
Sticky keys happen for specific reasons. Understanding these causes helps you fix the problem faster and prevent it from happening again.
Dust and debris build up inside your keyboard over time. Tiny particles fall between the keys and settle on moving parts. When you press a key, it has to push through this buildup, causing resistance or sticking. This is the most common cause and the easiest to fix.
Old grease inside the key mechanism can turn sticky and thick. Digital pianos use lubricant to keep parts moving smoothly. After months or years, this grease degrades and becomes gummy. When grease gets sticky, the key moves slowly or gets stuck in one position.
Humidity and temperature changes affect your piano’s materials. Wood expands and contracts with moisture levels. Plastic parts shift slightly when temperatures swing. These small movements can misalign the key slip or internal components, making keys feel sticky or sluggish.
Misaligned key slips occur when the plastic or wood strip under the keys shifts out of position. This strip guides each key’s movement. If it moves even slightly, keys can rub against it and stick. Moving your piano or bumping it can cause this misalignment.
Broken internal parts are less common but still possible. Springs can weaken or snap. Plastic connectors can crack. Metal contacts can bend. When these parts fail, keys stop responding properly and may feel stuck.
The good news is that most sticky keys come from dust, debris, or old grease. These problems respond well to cleaning. Start by cleaning the outside and between keys with a soft brush. If that does not work, you may need to open the keyboard assembly and clean the mechanism inside. Only move forward with disassembly if you feel comfortable doing so.
How to Diagnose a Stuck or Sticky Key
Start by testing the stuck key yourself. Press it down slowly and listen for any grinding or squeaking sounds. These noises tell you whether the problem is surface level or deeper inside.
Gently wiggle the key from side to side while it’s in the down position. If it moves freely, the stickiness might be from dust sitting on top. If it feels locked or resists movement, something inside the mechanism needs attention.
Try lifting the key up slowly without forcing it. A healthy key should spring back immediately. A sticky key will feel sluggish or hesitant as it returns to its resting position.
Press the same key several times in quick succession. Does it get worse, stay the same, or improve slightly? Repeated pressing sometimes loosens debris temporarily, which suggests dust or debris buildup rather than a mechanical failure.
Compare the sticky key to neighboring keys. Press keys on both sides of the problem key. If only one key sticks while others respond normally, the issue is localized to that specific key mechanism.
Check if the problem happens only after your piano sits unused for a while. Humidity and temperature changes can cause temporary stickiness that resolves after the materials settle back to normal.
Look at the key surface and around the edges. Do you see visible dust, dirt, or discoloration? Wipe the top and sides gently with a soft, dry cloth. Sometimes surface debris creates the illusion of a stuck key.
Press down on the key and hold it. Then try pressing adjacent keys. If the stuck key interferes with neighboring keys or feels physically blocked, misalignment might be the culprit.
Once you’ve completed these simple checks, you’ll know whether to try basic cleaning or move forward with opening the keyboard assembly. This diagnosis takes just a few minutes and saves you from unnecessary disassembly.
Tools You’ll Need Before You Begin
Before you start fixing your sticky key, gather the right tools. Having everything ready makes the job faster and prevents frustration.
A soft brush works best for removing dust around the keys. You can use a small paintbrush or an old toothbrush. Make sure the bristles are gentle so you don’t scratch anything.
Compressed air is your next essential tool. It blows debris out of tight spaces inside the keyboard. Hold the can upright and use short bursts. Never shake the can or tilt it sideways.
You’ll need a small flashlight or headlamp to see inside the keyboard assembly. The space under the keys is dark, and you need good visibility to spot debris and grease buildup.
Grab a few clean, lint free cloths. Cotton cloths work better than paper towels because they don’t leave fibers behind. You’ll use these to wipe around the key mechanism and remove old grease.
A small screwdriver set is important for opening your keyboard. Most digital pianos use Phillips or flathead screws on the back panel. Check your manual to see which type your model needs.
Isopropyl alcohol helps clean sticky grease. Use a cloth dampened with alcohol, not soaking wet. Never pour liquid directly onto your keyboard.
A small container holds screws and small parts while you work. This prevents losing pieces that you’ll need for reassembly.
Keep your piano’s manual nearby. It shows you where screws are located and how to safely open the assembly. If you don’t have it, check the manufacturer’s website.
Finally, work on a clean, flat surface with good lighting. A table or desk works perfectly. Lay down a cloth to protect the piano’s finish and catch any small parts that fall.
Step-by-Step Guide to Repairing a Sticky Key
Now that you’ve gathered your tools and diagnosed the problem, it’s time to fix the sticky key. Follow these steps carefully to avoid damaging your digital piano.
Start by powering off your piano completely. Unplug it from the electrical outlet and wait a few minutes. This keeps you safe while working inside the keyboard assembly.
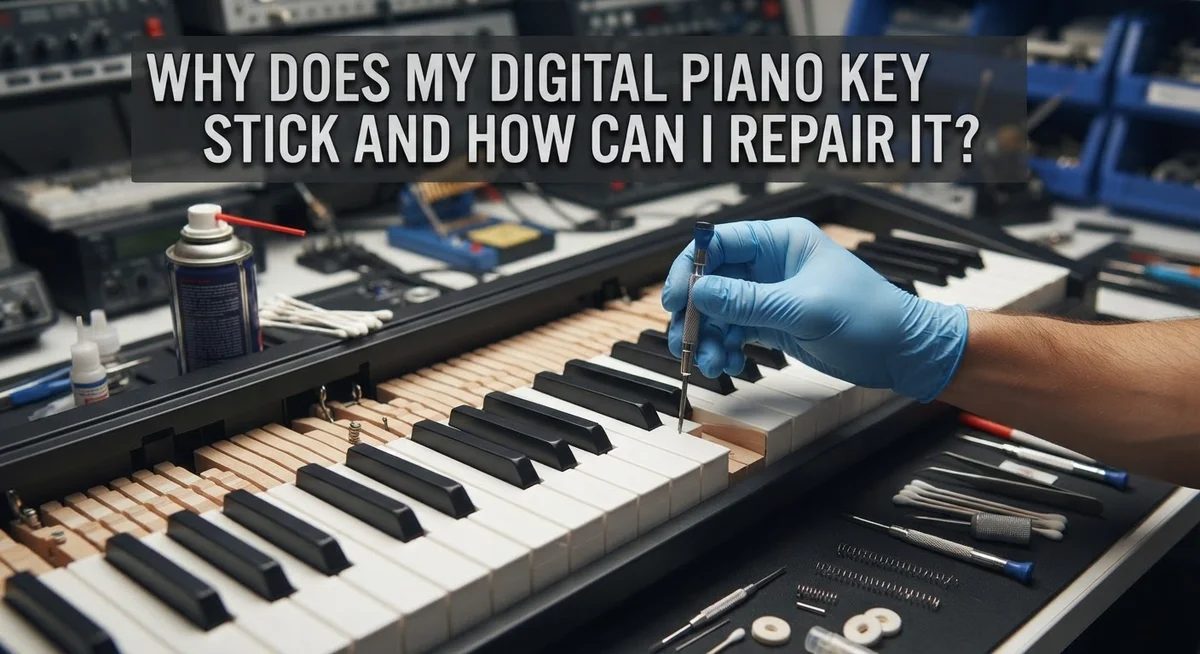
Next, locate the screws on the back cover of your keyboard. Most digital pianos have 4 to 8 screws holding the back panel in place. Remove each screw slowly and place them in your small container so they don’t roll away. Set the back cover aside on a clean surface.
Look inside the keyboard assembly where the keys connect. You’ll see the key mechanism with springs and small plastic or metal parts. Use your soft brush to gently sweep away dust and debris around the stuck key area. Work slowly and carefully. Compressed air works well here too, but use short bursts to avoid pushing debris deeper inside.
Now inspect the key stopper, which is the small piece that stops the key from moving too far down. If it looks misaligned or damaged, you may need to adjust or replace it. Gently wiggle it to see if it moves freely.
Look for old, sticky grease on the key mechanism. If you see dark, thick buildup, use a lint free cloth with a small amount of isopropyl alcohol to clean it away. Don’t soak the parts, just dampen your cloth slightly.
Once everything looks clean and dry, test the key mechanism by hand. Press the key up and down several times to check if it moves smoothly. If it still sticks, repeat the cleaning process.
Finally, reassemble your keyboard by replacing the back cover and tightening all screws evenly. Power on your piano and test every key to confirm the sticky key problem is solved.
Tips for Preventing Future Key Problems
Preventing sticky keys keeps your digital piano in top shape. The best approach starts with controlling your environment. Keep your piano away from direct sunlight and heat sources. Maintain consistent room temperature and humidity levels. Sudden changes in moisture cause wood and plastic parts to expand and contract, which stresses the key mechanism.
Dust and debris are your enemy. Wipe down your keys regularly with a soft, dry cloth. Do this weekly if you play often. Dust settles into gaps around the keys and builds up over time.
Use compressed air gently around the key edges every month. This removes particles before they cause problems. Never force air directly into the mechanism at high pressure.
Let your piano settle after moving it to a new location. Don’t play it hard or try to tune it immediately. Wait at least 24 hours for the instrument to adjust to its new environment.
Store your piano in a stable space. Avoid basements with moisture issues or attics with temperature swings. Choose a room with moderate humidity between 40 and 60 percent.
Check all your keys regularly while playing. Press each one and listen for smooth operation. Catch small problems early before they become major repairs.
Keep your piano’s manual handy and review the maintenance section. Different models have specific care instructions you should follow.
Never force a sticky key repeatedly. This damages the internal mechanism further. Instead, stop playing and investigate the cause.
Consider having a professional inspect your piano annually. They spot issues you might miss. This preventive care costs far less than major repairs later.
Finally, avoid eating or drinking near your piano. Spills seep into the mechanism and create sticky buildup. These simple habits protect your investment for years to come.
Common Mistakes to Avoid During Repair
Repairing a sticky key requires care and attention. Many people make mistakes that cause more damage than the original problem. Understanding these errors helps you fix your piano safely.
Forcing the key is the biggest mistake. Many people push or pull hard on a stuck key without inspecting it first. This can break internal parts that are expensive to replace. Instead, wiggle the key gently to understand what’s causing the problem.
Another common error is skipping the external cleaning step. People rush to open the keyboard and disassemble parts. Start with compressed air and a soft brush around the key edges first. This simple step solves many sticky key issues without needing deeper work.
Inadequate internal cleaning causes problems later. When you do open the keyboard, some people clean only the visible parts. Dust and debris hide in corners and under mechanisms. Take time to clean thoroughly around all internal components. Use a soft brush and compressed air carefully in tight spaces.
Reassembling without testing is another frequent mistake. People put everything back together without checking if the key moves freely. Test the key mechanism by hand before closing up the keyboard. Move it up and down gently to confirm it works smoothly.
Ignoring humidity and temperature control leads to recurring issues. Many people fix a sticky key, then it returns weeks later. Keep your piano in a stable environment with consistent humidity levels. Extreme temperature swings and moisture cause grease to degrade and keys to swell.
Finally, avoid disassembling more than necessary. Only remove what you need to access the problem area. Unnecessary disassembly increases the chance of losing small parts or misaligning components during reassembly.
If you feel uncertain at any point, contact your piano’s manufacturer. They can guide you through repairs or recommend professional service. It’s better to ask for help than to cause additional damage.
Troubleshooting Persistent or Recurring Issues
When sticky keys return after you’ve fixed them once, something deeper is happening. This section helps you understand why problems persist and how to stop them for good.
Recurring stickiness often points to environmental factors you can’t ignore. Temperature swings and humidity changes cause wood and plastic parts to expand and contract. Your digital piano’s internal mechanisms shift slightly with each change. Over time, this movement loosens parts and allows dust to settle back into the key mechanism.
Check your piano’s location first. Is it near a window, heating vent, or air conditioner? These spots create unstable conditions. Move your piano to a room with steady temperature and humidity levels. This alone stops many recurring issues.
Old grease buildup returns quickly if you didn’t remove it completely. When you open the keyboard, inspect every moving part carefully. Sticky residue from degraded grease attracts new dust particles. You may need to clean deeper than your first attempt. Use a soft brush and work slowly around each component.
Misaligned key slips cause repeated problems too. After reassembly, test every single key. Press each one slowly and listen for resistance. If the same key sticks again within weeks, the key slip may have shifted out of position during reassembly.
Document what you find each time you repair. Write down which keys stick, when they stick most, and what conditions surround the problem. This pattern helps identify the real cause. If humidity spikes cause issues, you need a dehumidifier. If dust returns quickly, you need better air sealing around the keyboard.
If problems persist after three repair attempts, contact your piano’s manufacturer. Internal mechanism damage or manufacturing defects require professional intervention. Continuing to disassemble and reassemble without success can cause more damage than the original problem.
Final Thoughts
Sticky keys happen to almost every digital piano owner at some point. Dust, old grease, and humidity are usually the main culprits. Most fixes are simple once you know where to look.
Start small before you dive deep. A gentle clean around the keys solves many problems without any disassembly.
If that doesn’t work, opening the keyboard is your next step. Take your time and work carefully through each layer of the mechanism.
Patience matters more than speed here. Rushing through repairs often creates new issues instead of fixing old ones.
Your piano’s condition reflects how you treat it daily. Small habits like wiping keys and controlling room humidity go a long way.
Every piano is a bit different inside. What works for one model might need slight adjustments for another.
Trust your instincts, but stay humble too. If something feels beyond your skill level, pause and ask for expert help.
A clean, well maintained piano rewards you with smooth, responsive keys for years. That responsiveness affects how you play and how music feels under your fingers.
Think of key maintenance as part of the instrument’s story. Each repair teaches you something new about how your piano works.
Keep tools nearby for quick fixes. A soft brush, some compressed air, and a clean cloth handle most situations.
Remember that sticky keys are rarely permanent damage. They usually signal something fixable, not something broken beyond repair.
Stay consistent with care, and problems become rare instead of routine. Your piano will thank you with better sound and smoother play.
In the end, understanding your instrument builds confidence. You’ll spot early warning signs before they turn into bigger repairs.
Good maintenance habits protect your investment and your enjoyment. A piano that plays well inspires you to play more often.
Take pride in keeping your piano in great shape. Every key that moves smoothly is proof that your care pays off.
Frequently Asked Questions
What causes digital piano keys to stick in the first place?
Sticky keys happen for several reasons. Dust and debris settle inside the key mechanism over time. Humidity changes and temperature swings affect how the internal parts move. Old grease under the keys becomes sticky instead of slippery. Sometimes the key slip (the part that guides keys) shifts out of alignment. Any of these issues can make a key feel stuck or sluggish.
How do I know if my stuck key needs professional help?
Start by gently wiggling the key up and down. If it moves freely but just feels slow, external cleaning might solve it. If the key won’t move at all or feels broken inside, stop and contact your piano’s manufacturer. Don’t force a completely stuck key, as you could damage internal parts. When you feel uncertain, reaching out to the maker is always the right choice.
Can I fix a sticky key without taking the keyboard apart?
Yes, try this first. Use a soft brush or compressed air to clean around the stuck key and nearby keys. Blow air into the gaps where the key meets the frame. Sometimes loose dust falls out and the key works again. This simple step works more often than you’d think. If the key still sticks after cleaning, then you may need to open the keyboard.
What’s the biggest mistake people make when fixing sticky keys?
The top error is forcing the key down without checking what’s wrong first. Forcing can snap internal parts or push debris deeper inside. Another common mistake is reassembling the keyboard without testing each key as you go. Always wiggle and press keys during assembly to catch problems early.

Hi, I’m Tessa! As a lifelong music lover and gear enthusiast, I started this blog to help fellow musicians navigate the overwhelming world of instruments and equipment. I spend my time researching, comparing, and reviewing musical gear so you can spend yours doing what matters most — making music.